Thursday, May 18, 2017

Mod Podge Blog Hop

This might be my favorite project this year:
 I wanted to create a fun serving tray that I could carry two drinks on that would not only serve as something of function, but also a focal piece. I have no intention of serving food on it so I knew I could add some fibers on the inside of the tray to finish it off.
 I started off with dominoes that I found at Walmart, a tray I picked up at Joann's, Beacon 527 adhesive, Cowgirl Digital from Calico Collage , Sparkle Mod Podge (because every Cowgirl can benefit from a little bling, right?), and Dishwasher Mod Podge.
 The first thing I did was adhere the digital download images to dominoes. I did not ink the edges, because those would not be seen in the tray. I also really liked the white! For this tray I needed 34 dominoes.
 Using Beacon 527 I laid the dominoes like tile on the tray making sure to mix up the pattern to create interest.
 I applied a medium coat of the sparkle Mod Podge first stirring well with my brush. It is important to stir and not shake it. I let this dry overnight.
 Since my intention is to use this as a serving tray with cold beverages I needed to make it waterproof. I will never run it through a dishwasher because it is medal and will rust. Plus, I wanted to use some fun burlap in it. The dishwasher Mod Podge is safe for a dishwasher which means it is waterproof so I finished off the project with it. I layered it on really thick making sure that it filled in the holes between the dominoes. I let this sit for 28 days.It takes that long to properly make sure it is cured. I then finished it off by adding burlap to the edges with the Beacon 527.
I am very happy with how it turned out! Not only can I serve drinks on it, I can also prop it up to display when not in use. 

Make sure to check out how other crafters used Mod Podge in their art!

Until Next time -- Happy Crafting!

Betz

Tuesday, May 16, 2017

Fairy DIY Gift

I made a necklace, matching card and gift bag for a Fairy Fan. I thought I would share how I did it. This was a super easy thing to make using a digital download. I found mine at Calico Collage ! She has the best art I have ever seen and a huge selection. It was hard to pick which one I wanted to feature.

To see how I put it together I made a video tutorial for you. You can find it here

Please subscribe to my blog and channel if you have not already done so. I have a lot of fun stuff coming out soon.

Until next time ~ Happy Crafting!

Betz

Friday, May 12, 2017

Tin Roof! Rusted!

Love Shake! Baby Love Shack! 

Sorry....I have had that song in my head forever and a day! Why? Well, because I have been wanting to put a metal looking roof (tin) on this bird house!

 It started off like this -- sad...ugly and plain. It really should be a spooky haunted house, but by the time I had figured that out it was to late. I already had spent a day putting it together. Instead of pitching it I decided to just hide it from myself until I could look at it again without getting mad. Have you ever been there? Gotten frustrated with yourself because you put so much time into a project and have it just turn out bad? I was there with this!
 I then started thinking about my little sad house and thought a roof that looked like gold would be cute on it and maybe save it from the dumpster. I pulled out my Rinea foiled paper and got to work! First thing I did was fold it over like so....
 Next, I punched a bunch of circles....
 I started on the botttom of the roof and applied a row of circles.
 Instead of keeping the roof all gold I thought it would add some personality to rotate in silver -- and that's just what I did :-)
 I repeated the process until the roof was covered.
 I hid the top crease with a line of Rinea circles.
 I folded and flipped up the edges to help the roof stand out.
I then went back through and did the same to the side pieces and porch. I punched some butterflies and leaves and sprinkled them on the house and called it done!
I really like the look of the roof! I think this will be my stand by on altering them in the future.

Until next time ~ Happy Crafting!

Betz

Wednesday, May 10, 2017

Sugar Skull Card

 I have a confession to make....though I am on who likes to push the limits in my art and I love edgy things, I have always steered clear of skulls. It is not like they offend me. I just struggle with the concept of them and making them pretty. However, living in the Southwest and participating in Day of the Dead and Cinco De Mayo I have grown to admire Sugar Skulls. I thought it was time that I used them in my art.
 I wanted to create something colorful, whimsical and pretty so I stuck with bright bold embellishments that I made with Rinea Foiled Paper
I found these Sugar Skull paper dolls to be gorgous and I had to use them from Calico Collage .

I upload a step by step how to on making this card here . Please go check it out and don't forget to subscribe if you have not already done so!

Until next time ~ Happy Crafting!

Betz

Monday, May 8, 2017

Mother's Day Card

Mother's Day is just around the corner! This year I decided to make my Mom a card with a bunch of fun stuff from Brutus Monroe that just came out! First up creating a base using the Scratch background with the Lemon Zest Surface Ink.

 I also stamped the butterfly with the same stamp and ink
 I used the Detail ink in Raven to stamp these gorgeous roses from the Banner stamp set.
 I wanted to add some color so I dabbed Sage Surface Ink on my craft mat, spritzed it with water and grabbed my paint brush.
 I painted the leaves with it.
 I did the same thing again using the Rouge Surface Ink on the roses.
 As the roses dried I stamped the sentiment on two tags that I had made out of the tag die cuts with the Peg Alphabet.
 I used my Scan n Cut to cut the flowers and cut out the backing from pop dot packaging.
 I put the butterfly together.

 I then put it all together.
 This went off in the mail today! I mailed her a little gift too (she lives in another state) so I did not have to worry about smashing the butterfly into an envelope.
Until next time ~ Happy Crafting!
Betz

Saturday, May 6, 2017

Rinea Foiled Paper Unboxing!

Guess what came? My Rinea DT box! I made the 2017 - 2018 DT and I am super excited! I had the pleasure of meeting the owner at Creativation 2017. I introduced them to my favorite local German restaurant. This company has a special place in my heart because it was born out of a childhood memory and tradition that took place in Germany. I was an exchange student my first year of college in 1993 - 1994 in Germany. I remebered this foiled paper and the stars at Christmas.
Please head over to my YouTube channel and watch the unboxing of this special paper here: Rinea Unboxing . Make sure to subscribe too!

Until next time -- Happy Crafting!

Betz

Tuesday, May 2, 2017

Sugar Skull ATC

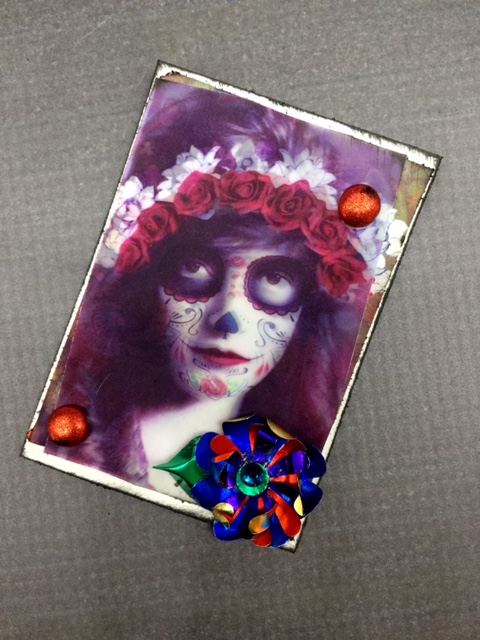
Cinco De Mayo is right around the corner! Every time I think about it or Day of the Dead which is November 2 I associate sugar skulls with them. I decided I wanted to make a spooky yet beautiful sugar skull ATC card. I download an ATC digital print sheet from Calico Collage and pulled out my Rinea Foiled Paper to make a shiny bright flower. I used vellum to give it a spooky appearance over the original digital art. I then used a permanent rubber cement technique to adhere the rest.

I uploaded a nice tutorial on the process here. Feel free to check it out!

Until next time ~ Happy Crafting!

Betz