Thursday, June 22, 2017

How to Use Stickers in a Planner

I love things that are pretty and functional! Needless to say, one of my very favorite things is my planner. 
To help keep me organized during the week I use icon stickers. For this week I used stickers by SRM! There were two sheets. One with icon and words. The other fun doodle strips!
I really appreciate that the icons are black and white. I like everything to match so this allowed me to color them in to coordinate with my Palm Spring themed planner. I used my copics. 

 Once I got all the icons colored in I added them to my weekly spread.


 I used the fun little dots above in a whimsical fashion in my Girl Boss insert. This is my work notebook! Finally, I used the fun doodle strips to make columns for my shopping list! I like to categorize everything according to how I shop. It just makes it easier for me and saves time. These doodle strips were perfect for that!
If you want to see how I set my planner up for summer please check out my walk through HERE .
Also, make sure you check out how other designers used stickers in their planner today too! 

 Until next time ~ Happy Crafting!

Betz

Sunday, June 18, 2017

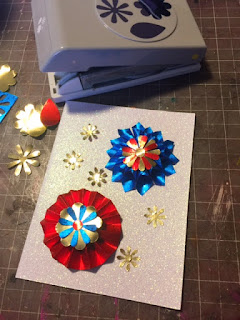
4th of July Card

Summer is in full swing in these parts and I can't wait for the 4th of July! To kick it off I made a fun card! Let me show you how to do it.
 To assemble this card you are going to need Star Struck Sapphire and  Glossy Ruby foiled paper. Cut approximately 8 squares at 1.5 inches. Then, cut those squares in half to make triangles.

 Roll each triangle around a pencil with the point as the center.
Gently squeeze the bottom of rolled foiled paper. The edges need to be fairly flat as to line up with the rest  of the petals.
 Adhere the pedals forming a circle on a card base. Make a rosette out of the Rudy Foiled Paper. Flip the leftover Ruby Foiled paper over and punch out flowers with the gold side.
 Assemble punched flowers and images on top of flowers and adhere.
 Add some bling for the center of each flower.
 Let adhesive dry and give to a loved one!

I like these flowers because they can be used on a multitude of projects. Make sure you check out Rinea Blog for more inspiration!

Until next time ~ Happy Crating! 

Betz

Thursday, June 8, 2017

Finnabair Steampunk

In October of 2016 I attended a mixed media retreat. I learned how to do the Finnabair technique and made this box:
I was addicted to this new form of art that I had never ventured into before. I taught it to my daughter and for Christmas we made boxes like the above for the ladies and for her Grandpa a big letter for his man cave! 

 When I was designing for Beacon I made this canvas:
 I have not gotten much of an opportunity to use this technique until a recent ATC trade in which I had to alter playing cards. One of the themes was steampunk. I created this for the trade:
 When I made the above card I wanted it to be an "Alice in Wonderland" theme. So, I used three digital downloads from Calico Collage . I was so happy with the outcome that I sent the owner a picture of it. She liked it so much and asked if I had done a video tutorial on it. Sadly I had not, but I decided to go ahead and do one. This is the card I created in the tutorial:
There are a few things to keep in mind when doing this technique. First, use your leftovers! Don't go out and buy things for it because you will go broke. This is a great way to use up your stash. The cool thing is you don't have to just use medal. You can use anything. I mean ANYTHING. It all gets gessoed black so it does not even matter. Second, it takes some time because there are multiple steps that require drying. Third, use a light touch and dry brush technique to apply the metallic color. If you want to check out the video on how to do this please go HERE.

Until next time ~ Happy Crafting!
Betz

Saturday, June 3, 2017

Father's Day Cards

It is almost here -- Father's Day! Do you struggle with finding the perfect gift for Dad? I know I certainly did! Now, I encourage the kiddos to make cards for their Dad served up with a homemade breakfast and a new lego set (really aren't men all into legos?) . I'm obsessed with Brutus Monroe's Stamp of the Month and thought it would pair nicely with a mustache embossed sheet of Rinea Foiled Paper in Copper.
 For the first card I ran a piece of Rinea Foiled Paper through my Cuddlebug with a mustache embossing folder I had in my stash. I adhered it to black cardtock, punched some stars out of Ruby Rinea Foiled Paper and assembled the card. I used some mesh from my stash to add a bit more texture to the card making sure it stayed flat so I could mail it.
 For the next card, I embossed copper foiled paper again. Only this time I used a white card base and assembled the card.
These cards are so much fun to make! They are easy enough the a kiddo can put it together for their Dad.

Make sure you check out the Rinea Blog for more inspiration!

Until next time ~ Happy Crafting!

Betz