Until next time ~ Happy Crafting!
Tuesday, February 27, 2018
Technique Tuesday Round Up
Every Tuesday I do a quick (2 - 3 minute) technique on my channel! Here are a list of the ones I did in February!
Thursday, February 22, 2018
Vacation Chunky Mini Album
One of my favorite things to do is travel. I love a good road trip! I often will go back to my home town. It is about a 12 hour drive and we have our favorite stops along the way. Half the fun is getting there! We love the journey. I created a mini album of our trips to California last summer. This is how I made the first page:


One of my favorite things is the tall base Architexture stickers from 7gypsies. They can double as a stencil and hold up nicely to sprays and paints. Here is where you can find all the supplies to make a mini album like this: Canvas Corp Brands Shop
I uploaded a video on my channel showcasing the rest of the album. Please check it out!
Until next time ~ Happy Crafting!
Wednesday, February 21, 2018
Make A Tote with Deco Fabric Glitter Pens!

When I attended Creativation 2018 I was able to get my hands on some fabulous goodies to play with. I absolutely love the Glitter Fabric Pens! Here is how I made this great bag!

To start the fabric paint flow in each pen I had to shake it and press the tip down.

I lifted it ever so often just to check and once I saw the pigment to the tip I knew it was time to color!

Every so often I had to shake the pen to get more paint. I colored one flower in and then did another flower in a different color. This seemed to allow the paint some time to nap after working so hard! I added a few crystals to each flower using Supertite Instant Glue


Once The gems were applied I outlined each flowers Nuvo Dew Drops.

I used coordinating colors on each flower:

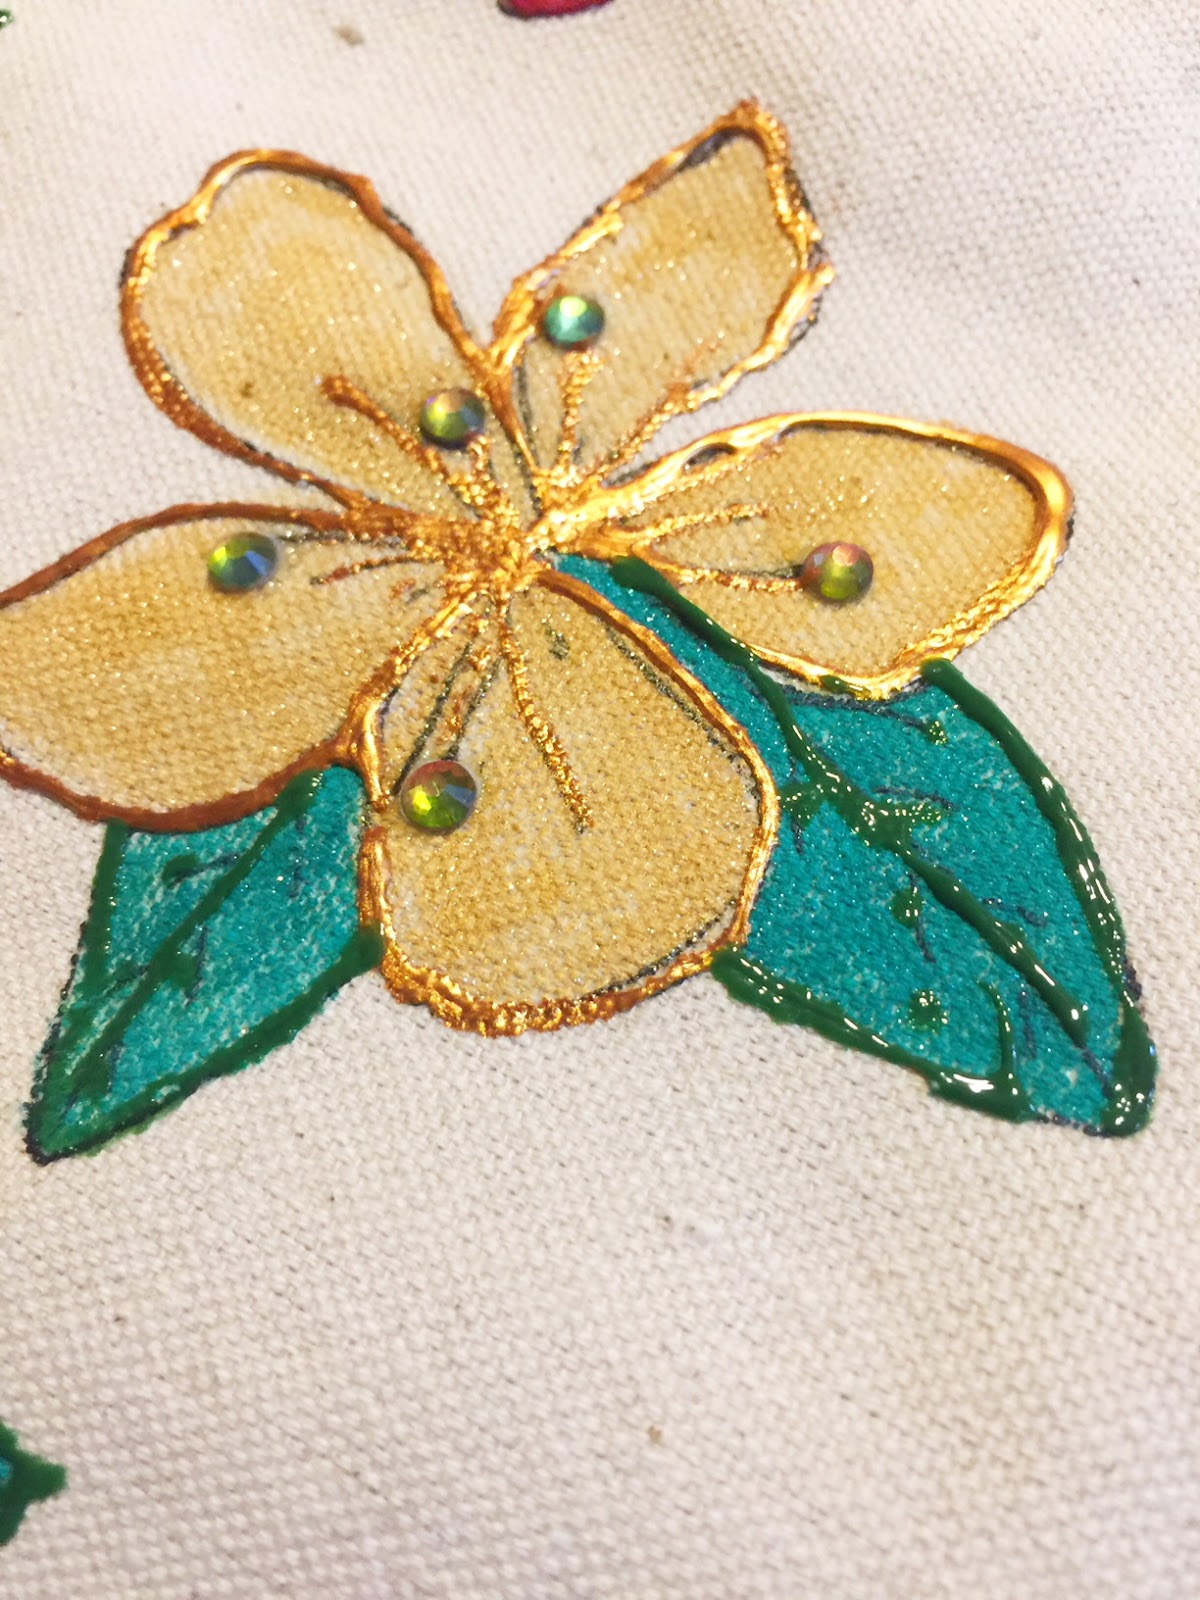
I love how it turned out!

Supplies:
Supertite (use code SUPERTITE-GOLDEN for 10% off of all orders over $5)
Until next time ~ Happy Crafting!
Sunday, February 18, 2018
Aged Shadow Box
Im over on the Rinea blog today sharing a sweet little shadow box I made. I used left overs scraps of foiled paper and the 3 D Rolled Star Die to create the center piece that I topped off with a Lisa Kettell Design head. The container is acutally a tin can I have stored flowers in for about a decade. I used one of the Prima paint systems to rust it up!


This project is quite stunning and came together relativly quickly!
Until next time ~ Happy Crafting!
Tuesday, February 6, 2018
Technique Tuesday!
I am starting a new series on my blog, "Technique Tuesday", in which I share a quick tip with you that is between 1.5 and 3 minutes long. This week I share how to stamp the perfect title. I use this layout as the example:


How many times have you wanted to stamp directly on something and been concerned it would go on crocked? This was a real struggle of mine for years until I learned this one simple trick and I am sharing it with you here:
Until next time ~ Happy Crafting!
Monday, February 5, 2018
Color Burst Layouts!
I created two layouts in which I used Colorburst as the background! I may never buy pattern paper again! Here is the first one:
 For this layout I used a red and yellow Colorburst. I drenched it in water because I really wanted it to run. I used a heat gun to push the color around and was quite pleased with how it turned out.
 Am I the only one that finds teenage birthdays (or just birthdays in general) challenging? I love the little clay resin piece from Lisa Kettell Designs ! It is the perfect finishing touch to the layout.
I then created this layout using Tim Holtz Distress crayons in a red a blue color and layering Colorburst on top of it. I colored half the side where the picture is red and the other half blue. I rubbed it out a little with my damp finger. I added Colorburst over the color they matched and extended it out just a little with my sprinkling. I misted it heavier closest to the spot the picture was going to go and lighter farther away. I did not use a heat gun because I did not want to push the color around. I let it dry and added Nuvo drops from Tonic.
 I die cut stars from Rinea Foiled Paper and added them to the bottom corner of the page.


I then created this layout using Tim Holtz Distress crayons in a red a blue color and layering Colorburst on top of it. I colored half the side where the picture is red and the other half blue. I rubbed it out a little with my damp finger. I added Colorburst over the color they matched and extended it out just a little with my sprinkling. I misted it heavier closest to the spot the picture was going to go and lighter farther away. I did not use a heat gun because I did not want to push the color around. I let it dry and added Nuvo drops from Tonic.


Thanks for stopping by!
Until next time ~ Happy Crafting!
Sunday, February 4, 2018
Colorburst Tips!

I get a lot of questions on how to use Colorburst without ending up with a puddle of muddy brown. I am going to share with you three principles that will help you achieve the beautiful colors you want on your projects. These tips do not only apply to Colorburst, but to any kind of water based paints and mists.
1) Keep your blue tones together. Only use blue with greens and even yellows if you are going for green.
2) Keep your warm tones together. Only use red with pinks, oranges and yellow if you are going for orange.
3) Only use purple with blue OR red. Purple will turn everything brown. If you mix purple with blue and green you will get brown. If you mix it with red and orange you will get brown. So, either use it alone of with just blue or just red.
These cards along with the products I used are featured on the Brutus Monroe Blog .
Until next time ~ Happy Crafting!
Saturday, February 3, 2018
Floral ATCs with Foiled Paper!
Today I am over on the Rinea blog with an amazing tutorial on how to make these:

I hope you enjoy and give it a try! The results are stunning!
Until next time ~ Happy Crafting!

I used one die to make three different flowers. The die was originally created to make authentic German Stars at Christmas. However, my creative juices started flowing and I made more than just starts! Please check it out here: Rinea
I hope you enjoy and give it a try! The results are stunning!
Until next time ~ Happy Crafting!
Subscribe to:
Posts (Atom)