I am still working on catching up my family album! For November I set goals to complete a set amount of scrapbook pages each week. Here is what I accomplished:
This layout makes me smile because it is three generations. The picture was taken last summer on a trip back home in which I got to met my nephew for the first time.
I finally got last year's Christmas cookie decorating page done:
The following is not a layout, but an art journal page I created. I have been struggling with some self worth issues lately. I journaled about my feelings in the background by rotating the journal 90 degrees after I filled up the page. The colors and look represent how I have been feeling internally.
Here is a round up of cards that I made in November. Be prepared there is no rhyme or reason! It is a hodge podge of creative happiness!
I used Tim Holtz Distress Oxide to create the background for this sweet little guy :-) The penguin I ran across at the Mixed Media Convention in July of 2017 before he was released. I did not forget about him and ordered him the minute he became available. It is a layering stamp set and matching die.
I created this card with the new Water Lilly Background stamp from Brutus Monroe and the Spellbinder February 2016 card kit that I picked up at the Pinner's Conference in October of 2017. I think it will be beautiful for spring!
Here are five cards I created for We Craft that have been and will be featured on their website over the next few months:
The following is a technique I learned! I uploaded a tutorial here:
Can you believe it is almost Christmas! This time of year in our house is by far the busiest! Not only do we have the typical hustle and bustle because of the holidays, but two of my boys have birthdays a week apart and my son's basketball season is in full swing. To help keep me organized and on top of things I have to have a functioning planner. I use two planners. One is a TN I carry with me that doubles as a wallet and the other is a Happy Planner that sits on my desk. The Happy Planner has the monthly overview as well as everything related to family life and my work. I did a walk thru of my planners for you.
Have you joined the Stamp of the Month Club yet? You will receive a sweet little stamp set for $5 (which includes shipping) every month AND you will get 10% off what ever you order in the shop as long as you are a member of the club! I created this card with December's SOM:
I stamped the two different heart from the set on banner pieces I die cut. The Balloon is also part of the set! I stamped it on a piece of flat pink card stock, trimmed it and used pop dots to adhere to the tag.
I splattered Colorburst on a Kraft card base to start this perfect card for the coffee fall lover! The little coffee is from the Cozy Coffee Stamp Set. I colored it in with Studio 71 colored pencils and cut it out. I layered two pieces of washi tape and then sentiment on top. I used pop dots on the coffee and finished it off with some gorgeous scarlet colored gems.
I signed up to partcipate in a Christmas Card Swap! I created a total of 20 cards to exchange with other artist around the country. I showed the first set at the end of October and wanted to feature the last 8! This set coordinates with one another because it is from the November 2016 Spellbinder Card Kit! I found their booth at the Pinner's Conference in October. They had a special in which you could buy two past kits for $30 -- that is only $15 a kit! When I saw how fun and whimsical this kit was I knew I wanted to play with it. There was so much packed into this kit that I had a ton left over. Here are the nine cards I created:
Not only did the cards turn out darling they came together super fast!
In early November I attended the Rubber Stamp Expo in Mesa Arizona. My hope in attending was to learn one new thing and discover a new stamp company to me. I spent about 2.5 hours at the show and I achieved both! Check out my review and haul!
My new obsession is Ken Oliver's Colorburst for Brutus Monroe. I used it to create the backdrop for the sweet little campers and sentiment for this card. I stamped three of the five trailers from the Road trip Brutus Monroe Stamp set, colored them in with Style-file markers, and cut them out on my Brother's Scan N Cut. I layered my colorburst piece on white card stock and adhered to a black card base. I used pop dots to adhere the trailers. I stamped the sentiment with surface ink and layered it on a small colorburst strip. I finished it off with little acrylic bubbles.
You can find all of the supplies to create this card at Brutus Monroe. I am also on the blog today so pop over and say hi!
As I was helping at the Brutus Monroe booth at the Mixed Media Convention in Utah I met the sweetest lady who owns a great stamp company -- Pink and Main ! I fell in love with her stamps and beautiful pink dies. There was one set I just could not get over. I thought about it for months. I stalked her Instagram and website waiting for it to be released. Finally, in October, is was available! I bought the set, matching dies and the most adorable paper pack to match!
I am still not over this stamp set. I need to create some more with it because it just is not leaving my system. Make sure you check out my layout round up at the end of the month to see the page I created with this set for the family album!
I had the privilege of meeting Ken Oliver at the Mixed Media Convention in July of 2017. I got a one on one demo and lesson on how to use Color Burst and have been addicted ever sense! I made these two cards using the new Color Burst for Brutus Monroe !
For this card I used a background stamp and applied the color burst on top of it after I embossed it.I stamped the bow pieces and sentiment. I adhered it all the a glitter card base and topped it off with a few bottle cap sequins.
The next card I used a stencil to lay the Color Burst on making sure I stuck with colors that would not create a muddy look. I stamped the cute fist and used my Scan and Cut to cut them out. I stamped the sentiment on a circle I had die cut out. I adhered a few acrylic bubbles to finish it off.
This last background I created with this particular image in mind. I used a piece of watercolor paper to lay the Color Burst out on. I wanted the background to resemble a jungle so I used Cabbage and Zest. I sprinkled the color and misted it. At first it was to bright (yes, believe it or not it was brighter than this!), so I immediately dabbed it with a paper towel which picked up the excess color. I slowly sprayed droplets over it and was happy with it.
Here is a video showcasing different techniques and basic color theory to keep in mind when using Color Burst:
If you are interested in any of the products I used you can find them all here: Brutus Monroe Shop
I ran across the beautiful Christmas line by Kaiser Craft in July at the Mixed Media Convention in Utah. They gave me a few pieces (stamps, dies, wood pieces and die cuts) to play with at the end of the show and once the paper became available in stores I had to have a few sheets. I created these five cards and purse (that will house a gift card perfectly!) with two sheets of the pattern paper. The Festive Deer Stamp and Sterling Embossing powder by Brutus Monroe had to take center stage!
I tend to get bored and uninspired when I made all the cards the same. I like to mix it up! I could easily give the cards as a set to a family member with a big silver bow or mail them out. This project took me about three hours and I love the elegant nontraditional vibe!
My daughter is taking Honors History this year. One of her assignments is to do a report on an Asian country's history. Since she is in honors she gets a little bit more freedom with how to present the report. She has decided to present it in this paper bag journal I created. Her teacher gave her permission to use it knowing that I created it. My daughter is super excited to use do the report. I created a video for you on how it came together and a few tips on how to make one.
The Junk Journal kit is from Calico Collage
The paper trimmer is from Cutter Pillar . Make sure to use the coupon code: BETZ20 for 20% off your entire order.
If you have never heard of Scriver Creek I bet you think I have lost my mind and am making up words. Believe it or not, it is a company! They specialize in beautiful leather notebooks. They gained a lot of popularity real fast and underwent some criticism from the planner community because they got backed up with orders. It was growing pains and a lot of businesses go through it. I decided to give this company a chance and provide you, my subscribers, with an honest review of the company and their scallop leather notebooks. Going into this I am giving the benefit of the doubt. I can't start of any kind of relationship in negativity and choose to see the positive. I truly believe that this is a small business that turns out great product AND supports their community. Supporting their community is what has led me to my recent purchase with them.
One of the new things Scriver Creek has started is a "Simple Scallop" line. These are notebooks that are not custom made, but are made from the leather they use or trying out in their shop. They also have hired local high schoolers to make them -- they are teaching a trade! The notebooks are only available on Fridays in limited quantities. The type and colors change depending on what they have in the shop. The cost is $40 and includes shipping. I ordered one in a gorgeous dark brown that almost has a purple undertone to it. Here is the unboxing and my review:
As a child I had a similar image done of me at Disneyland. Every time I see these it makes me think of Disneyland. For this card I wanted to keep it clean and simple. My original thought was a black and white card, but when I paired the mint with it, it was the perfect mix. Just a simple "hello" sentiment is all that is needed to finish it off. When stamping images like this it is best to ink the stamp up at least twice to get a nice clear crisp image.
I am on the Brutus Monroe Blog with this card. Head over for even more inspiration.
I am over on the Rinea Blog today with a fabulous Thanksgiving centerpiece!
There is a step by step tutorial on how to make one for your table. If you want to be able to view it from both sides simply make two and adhere in the middle.
I wanted something that reflected a turkey, but was not a turkey. I choose my favorite part -- the tail and finished it off with a big beautiful rose.
I have kept a school album for each of my children from preschool through high school. Well, they still are in school, but it will go through high school. When they were little it was so much fun and easy to find cute back to school paper crafting goodies. As they have gotten older it has become challenging to find anything back to school that is mature like them, yet reflective of who they are and what they are becoming. So, I have ventured outside of the typical back to school supplies and used other things for the layouts.
Parker is going into the 6th grade. He needed something cool, but still kid friendly. I opted for stars in different textures in which I die cut out in various shapes and used as a border. I added a few bottle cap sequins from Brutus Monroe to finish it off.
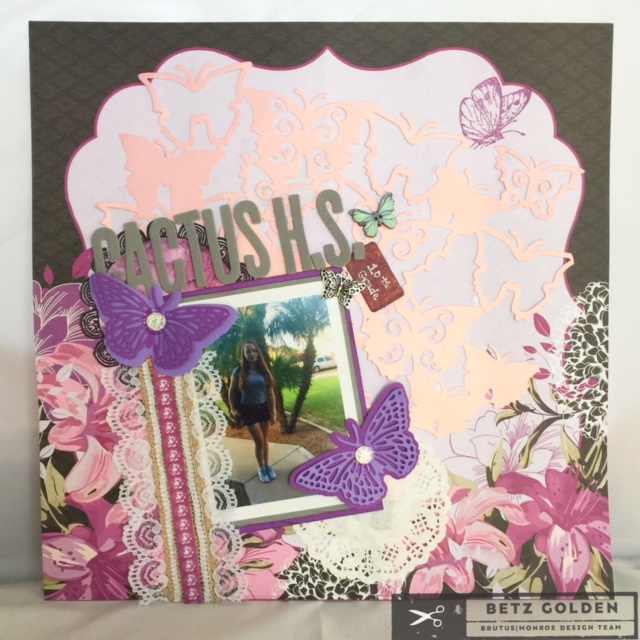
Annie is entering 10th grade. I decided to use an inspirational kit from Brutus Monroe because she is changing from an impressionable child to a confidant young adult. It reminds me of a transformation that a butterfly undergoes. I love the layering butterfly die!
Logan is entering 11th grade! I decided to use a library back ground stamp and a traditional school style stamp set by Brutus Monroe to create his page. I added a small basketball because that is his life!
This is the first year I did not use the same sketch and product line for each kiddo. They each turned out great and I hope the kids will cherish them when they receive their albums.
Christmas is a special time of year and getting everything done to create a fun memory can be a challenge with a family of five. I need all the help I can get, so I created this planner. This is a two part post. First, I show you how to make the cover for the planner. Then, I show how to make a pocket folder for it in a video. I hope you enjoy it and find it useful!
To create the cover you are going to need two pieces of foam found in the kids' section of most craft stores. One needs to be adhesive and it if sparkles even better!
Measure two lines with a ruler on the backside of your adhesive foam with a pencil.
Take a circle, fold it in half and use a ruler to trace the line.
line up the line on the circle with the one on the adhesive backing and trace half the circle.
Repeat that process and cut out the scallop border. Set aside.
Measure your cover to your preferred size. Find the center and score 1/4 inch line on the right and left of the center (leaving a 1/2 inch space).
Mark where to place your holes for the bands.
Punch holes. I like the Crop-O-Dile because it cuts any thickness.
Adhere your scallops to the cover lining up the edges.
Thread your elastic thread through the two holes according to how many inserts you are going to use.
Here is a video on how to make the multi pocket file:
Here are a few pictures of the inside of the complete planner:
This was a ton of fun to make and I can't wait to use it this season!