My daughter is involved in the drama department at her school. She has been in one play and one musical this last year. There was a mini album class featuring Graphic 45 and their vintage hollywood line. I knew it would be perfect for her, so I signed her up. She cam home with lots of scraps which I was thrilled with! I could not wait to make cards with them, but first this ATC:
To see the details on how to make your own ATC please visit the Rinea Blog . There is a ton of great inspiration over there!
Until next time ~ Happy Crafting!
Betz
Welcome to my little spot in the cyber world! I am a mixed media artist that will always hold a special place in my heart for paper crafting.
Showing posts with label Beacon. Show all posts
Thursday, August 3, 2017
Monday, July 3, 2017
4th of July DIY
4th of July is almost here! I created this fun center piece!
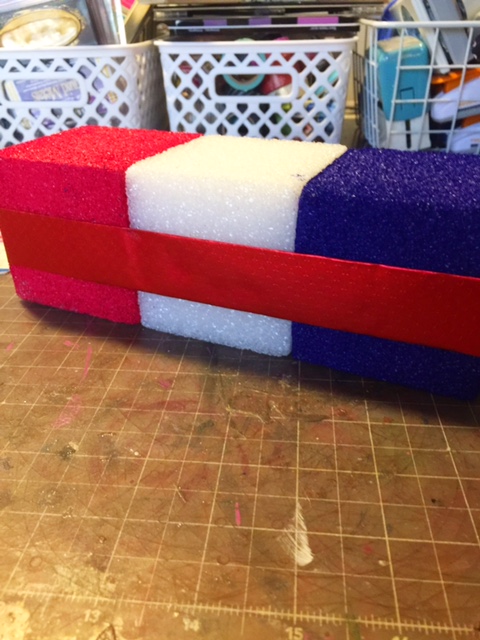
I gathered some paint, Rinea Foiled Paper, stencils and FloraCraft cubes to create it.Here are the pictorial steps on what I did to make the centerpiece.
To see the full tutorial and find all of the supplies I used to create this please head on over to the Rinea Blog
Unitl next time ~ Happy Crafting!
Betz
Labels:
4th of July,
Beacon,
DIY,
FloraCraft,
foiled paper,
Rinea
Thursday, May 18, 2017
Mod Podge Blog Hop
This might be my favorite project this year:
I wanted to create a fun serving tray that I could carry two drinks on that would not only serve as something of function, but also a focal piece. I have no intention of serving food on it so I knew I could add some fibers on the inside of the tray to finish it off.
I started off with dominoes that I found at Walmart, a tray I picked up at Joann's, Beacon 527 adhesive, Cowgirl Digital from Calico Collage , Sparkle Mod Podge (because every Cowgirl can benefit from a little bling, right?), and Dishwasher Mod Podge.
The first thing I did was adhere the digital download images to dominoes. I did not ink the edges, because those would not be seen in the tray. I also really liked the white! For this tray I needed 34 dominoes.
Using Beacon 527 I laid the dominoes like tile on the tray making sure to mix up the pattern to create interest.
I applied a medium coat of the sparkle Mod Podge first stirring well with my brush. It is important to stir and not shake it. I let this dry overnight.
Since my intention is to use this as a serving tray with cold beverages I needed to make it waterproof. I will never run it through a dishwasher because it is medal and will rust. Plus, I wanted to use some fun burlap in it. The dishwasher Mod Podge is safe for a dishwasher which means it is waterproof so I finished off the project with it. I layered it on really thick making sure that it filled in the holes between the dominoes. I let this sit for 28 days.It takes that long to properly make sure it is cured. I then finished it off by adding burlap to the edges with the Beacon 527.
I wanted to create a fun serving tray that I could carry two drinks on that would not only serve as something of function, but also a focal piece. I have no intention of serving food on it so I knew I could add some fibers on the inside of the tray to finish it off.
I started off with dominoes that I found at Walmart, a tray I picked up at Joann's, Beacon 527 adhesive, Cowgirl Digital from Calico Collage , Sparkle Mod Podge (because every Cowgirl can benefit from a little bling, right?), and Dishwasher Mod Podge.
The first thing I did was adhere the digital download images to dominoes. I did not ink the edges, because those would not be seen in the tray. I also really liked the white! For this tray I needed 34 dominoes.
Using Beacon 527 I laid the dominoes like tile on the tray making sure to mix up the pattern to create interest.
I applied a medium coat of the sparkle Mod Podge first stirring well with my brush. It is important to stir and not shake it. I let this dry overnight.
Since my intention is to use this as a serving tray with cold beverages I needed to make it waterproof. I will never run it through a dishwasher because it is medal and will rust. Plus, I wanted to use some fun burlap in it. The dishwasher Mod Podge is safe for a dishwasher which means it is waterproof so I finished off the project with it. I layered it on really thick making sure that it filled in the holes between the dominoes. I let this sit for 28 days.It takes that long to properly make sure it is cured. I then finished it off by adding burlap to the edges with the Beacon 527.
I am very happy with how it turned out! Not only can I serve drinks on it, I can also prop it up to display when not in use.
Make sure to check out how other crafters used Mod Podge in their art!
Until Next time -- Happy Crafting!
Betz
Labels:
Beacon,
Blog Hop,
cowgirl,
digital art,
dominoes,
downlaod,
how-to,
Mixed Media Art,
Mod Rodge,
retro
Tuesday, May 2, 2017
Sugar Skull ATC
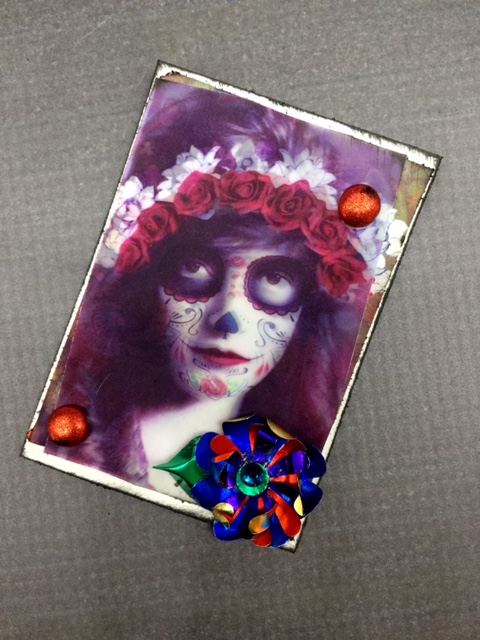
Cinco De Mayo is right around the corner! Every time I think about it or Day of the Dead which is November 2 I associate sugar skulls with them. I decided I wanted to make a spooky yet beautiful sugar skull ATC card. I download an ATC digital print sheet from Calico Collage and pulled out my Rinea Foiled Paper to make a shiny bright flower. I used vellum to give it a spooky appearance over the original digital art. I then used a permanent rubber cement technique to adhere the rest.
I uploaded a nice tutorial on the process here. Feel free to check it out!
Until next time ~ Happy Crafting!
Betz
I uploaded a nice tutorial on the process here. Feel free to check it out!
Until next time ~ Happy Crafting!
Betz
Labels:
Arizona,
ATC,
Beacon,
Brutus Monroe,
Calico Collage,
card,
digital art,
downlaod,
how-to,
Mixed Media Art,
Rinea,
Sugar Skulls,
tutorial
Sunday, April 30, 2017
Enchanted Rose Coaster
I am going through this phase right now that includes dominoes, Brutus Monroe Surface Inks and background stamps. No Joke! It is hard to find a universal ink that does everything and can be used on anything. Add to that a big beautiful image and being able to use it all on an everyday item...or at least something that most homes have in a new way makes me a happy crafter! I created this:
It's a coaster. A totally usable functional beautiful coaster. I' m over on the Brutus Monroe Blog today in which I show you how to create this step by step. Check it out here: Brutus Monroe. I am even enabling because you can visit the store and pick up the stamp and inks. Sorry....not really....but don't say I didn't warn you ;-) For realz though! Head over and check it out! This is one of the coolest things I have come up with in my wee little brain in a long time.
Until Next Time ~ Happy Crafting!
It's a coaster. A totally usable functional beautiful coaster. I' m over on the Brutus Monroe Blog today in which I show you how to create this step by step. Check it out here: Brutus Monroe. I am even enabling because you can visit the store and pick up the stamp and inks. Sorry....not really....but don't say I didn't warn you ;-) For realz though! Head over and check it out! This is one of the coolest things I have come up with in my wee little brain in a long time.
Until Next Time ~ Happy Crafting!
Labels:
background stamps,
Beacon,
Brutus Monroe,
cork paper,
DIY,
dominoes,
enchanted,
enchanted rose,
how-to,
Mixed Media Art,
new releases,
rose,
stamps,
Surface ink,
tutorial
Wednesday, April 12, 2017
Summer Paradise Planner
Hi Friends! I am super excited about the new and one of a kind planner kits that you can digitally download! I talked at great lengths with the owner of Calico Collage about what us planner gals would find useful. I am proud to present the "Summer Paradise Planner Kit"
This is not like your typical Etsy sticker planner kit. This is entirely different and amazing! I show you here . Please go check it out -- you won't be disappointed!
Until Next Time ~ Happy Crafting
Betz
Labels:
Beacon,
Calico Collage,
digital art,
distress,
distress ink,
DIY,
downlaod,
fiskar,
girlboss,
happy planner,
how-to,
planner,
Scan n Cut,
the planner society,
tim holtz,
tutorial
Monday, April 10, 2017
Rinea Flower Band
I created a travel journal last week and this week I wanted to finish it off with a travel band! This is both pretty and functional. It is common for me to lose paper and bits I need while on the road in my car because it falls out of the place it was suppose to be!
The tutorial on how to make this is here
You can find the Rinea here
Until next time ~ Happy Crafting!
Betz
Labels:
Beacon,
Calico Collage,
DIY,
downlaod,
how-to,
Rinea,
scrabook,
the planner society,
tutorial
Friday, April 7, 2017
DIY Matching Necklace and Magnet
Hi crafty friends! Betz Golden here! Today I am sharing with you a sweet necklace and matching magnet I made as a gift for my Mom.
I found these keys with stickers by Tim Holtz in the clearance section at my local craft store and knew they would be perfect for jewelry!
Since I made this necklace for my Mom I had to use the sticker "Her Majesty" because growing up she would always say she was the queen. First I added the sticker and covered it with the clear dome as provided in the package.
My Mom likes a little bling....well...she likes A LOT of bling and who can blame her? I had some pretty purple gems in my stash and added them to the key. I used Gem-Tac to adhere them.
I like odd numbers -- so 3 it is!
I found some beautiful digital download at www.calicocollage.com that I knew would be perfect for the necklace. I selected the letter "P" because that is the first letter of my Mom's name. I used a circle punch and cut it out.
I adhered the image to the metal circle piece with ZipDry.
I carefully placed it in the center of the circle.
I added the clear dome....
[Pic 9]
And I blinged it out Using Gem-Tac and the same gems I used on the key.
I wanted to make a bottle cap magnet because I had leftovers and my Mom really likes to decorate her refrigerator. So, I took my craft hammer and flattened the edges of a bottle cap a little.
I then repeated the process on the magnet. Once the gems were dry I threaded a cord I had in my stash to make the chain of the necklace. I made a simple knot in the back of it making sure it was large enough to get over one's head.
This was a super easy and fun project and I highly recommend handmade jewelry for Mother's Day, Easter and birthdays!
Until next time ~ Happy Crafting!
Betz Golden
Labels:
Beacon,
bottle caps,
Calico Collage,
darice,
digital art,
distress,
distress ink,
DIY,
downlaod,
how-to,
jewelry,
key,
magnet,
tim holtz
Friday, March 31, 2017
Bash Your Stash Week 1 April 2017
How many of us have a slew of things in our stash that we probably will never use? I know I do! So, for the month of April I thought it would be fun and beneficial to host a BASH YOUR STASH challenge! To learn more about the challenge and join along check out my video laying it all out for you here
The above is what I created for week one....well a sneak peak. You can find the full reveal and details in the video! I hope you play along and get that creative mojo going!
Until next time -- Happy Crafting!
Betz
Labels:
bash your stash,
Beacon,
card,
DIY,
fiskar,
girlboss,
how-to,
layout,
Mixed Media Art,
prima,
Scan n Cut,
scrabook,
tags,
tutorial
Thursday, March 16, 2017
Spring Peacock Card
Yesterday I shared with you the care package I made for my friend. Today I wanted to share with you the card I created to go with it.
Please visit my YouTube to see how it all came together HERE and make sure you are subscribed so you don't want to miss out on all the fun creative things coming in the future!Until next time ~ Happy Crafting!
Betz
Labels:
Beacon,
Calico Collage,
digital art,
downlaod,
fiskar,
how-to,
Mixed Media Art,
peacock,
Rinea,
stickles,
tim holtz,
tutorial
Wednesday, March 15, 2017
Spring Peacock Care Package
I signed up for an ATC swap and was paired up with a friend of mine that lives across the country. We know each other in real life which made the pairing extra special. For the last two years her and I have gotten together with a group of other artists from around the country in Texas for a long weekend of art! Sadly, this past October the lady who founded the retreat -- our friend and art mentor-- was found dead in her store. It broke our hearts. We all are still mourning the loss of this wonderful caring individual who touched our lives in different ways. Therefore, when the opportunity presented itself to send one of my dear hurting friends a package I took it!
Here is the ATC I made for the requirements of the swap. I used Tim Holtz tissue paper, sprays, stains, grungeboard, and Prima fiber and bling with a little Close to my Heart swirl.
I added in a couple other things to round out the package and really make it special. To see how it all came together please check out my YouTube! Make sure to subscribe to both my blog and my YouTube channel if you have not already done so. Just click HERE :0)
Until next time ~ Happy Crafting!
Betz
Labels:
ATC,
Beacon,
Calico Collage,
digital art,
DIY,
downlaod,
how-to,
Mixed Media Art,
peacock,
Puzzle,
Rinea,
tim holtz,
tutorial
Monday, March 13, 2017
Peacock Puzzle Frame
One of the projects I decided to do was a frame and print using the Spring Peacock by Calico Collage for a care package of sorts for my friend. Originally I had planned to black gesso the puzzle pieces, but I changed my mind. I will explain why a little later. For now here is my piece and the process I went through to make it!

I put the print in the frame because I had to alter around the peacock. I did not want to accidentally have a puzzle piece over the head of the peacock.
I notice the puzzle had a lot of pieces of the sky that matched the print perfectly. This is when I decided to put the black gesso away and just use the pieces as they were and I am really glad I did.
I used Quick Grip to adhere the puzzle pieces to the frame because it pretty much holds everything!
I adhered the first layer of puzzle pieces....
and went over it a second time making sure I added some feathers!
Next, I added some gems from my stash that matched!
I pulled out some Emerald Green paint by Prima to dry brush on the puzzle pieces.
Once the paint dried I decided it was finished.
Come back this week to see the rest of the care package and the other fun altered things I made for it as well as how to create your own care package for a loved one.
Until Next Time ~ Happy Crafting!
Betz
Labels:
Beacon,
Calico Collage,
digital art,
DIY,
downlaod,
how-to,
Mixed Media Art,
peacock,
Puzzle,
tutorial
Subscribe to:
Posts (Atom)