Tuesday, July 31, 2018

Exploding Birthday Box

My daughter turned 16 over the summer and I knew that not just any card would do. She has a fantastic sarcastic personality and not a fan of bright colors. I had a fun exploding Box Die Set from Pink and Main that I wanted to use. I made the first one in a traditional fashion:
It turned out great and I had a blast making it, but it ended up better suited for one of her best friends. So, I ordered Fired Up! stamp set because she likes dragons!  I also picked up the Celebration Pack from Pink and Main and die cut out each piece twice.
 I adhered the edges:
 And added the panels:
 Making sure I kept the back one up and not folded down.
 I added the sentiment and a few gloss dots from Pink and Main to what would be the front of the box.
 Next I lined up the inside pieces so they touched each other to create even spacing.
 I got my poppers ready!
 And adhered them to the inside of the box.
 This was the final box!
 But it was to young for her. It was cute, but not perfect for her. So I thought outside of the box and created this:
Here is a great video I did on the entire process:


Here is where you can find all the Tim Holtz products used in the video.

It looks like three is the lucky number! It took that many attemps to get the perfect Birthday Box for her.

Until next time ~ Happy Crafting!

Monday, July 30, 2018

Gel Plate Pressed Tote

We have a fun blog hop featuring Rita Barakat and Plaid Fabric Paint! This paint is wonderful. It is water soluble so clean up is a breeze, but once it is heat set it is permanent. This is the what I made with it:
Here is a tutorial on how to create this:


Now, hop on through to all these amazing blogs:

Until next time ~ Happy Crafting!


Saturday, July 28, 2018

Pink House Boutique and The Hop Shop

 I recently purchase a car for my daughter and was driving it home after I transfered the title. I was hungry and had a few hours before I had to be at my next appointment. I was on Grand Avenue which runs with the railroad and exited when I saw the sign for it I parked my car and started walking the main street when I ran across the coolest funkiest store ever -- Pink House Boutique. Downtown Glendale has amazing antique shops that line the main street as well as side streets. This store is a little different.
 What caught my eye was the Pin Up dresses in the window. As I got closer I noticed they carried them up to a 4X! I could not stop myself -- I had to go in and take a look. Not only did they have an awesome assortment of hundreds of  dresses, they had purses and jewelry ranging from vintage, retro to antique. There were sassy pictures, tumblers and accessories as well as a section of sweet antiques perfect for a Vintage girl. I have never been in a shop with this many different products spanning over so many decades yet all cohesively put together. The prices were reasonable too! Sadly I could not take pictures in the store, so I encourage you to check out there website here  and if in the area stop by the shop (7009 N 58th Ave Glendale AZ 85301 -- (623) 298-4766 )
 One store down is my favorite diner -- The Hop Shop! I am partial  to this diner because they carry gluten free bread and the chef always makes sure to wipe down the kitchen area he is working for folks like me with a gluten intolerance. Betty Boop welcomes visitors along with an assortment of delicious retro desserts.

 The restaurant is immaculate with retro and vintage decor everywhere. It really feels like you are taking a step back in time when you sit down to order and eat. The waitresses even refer to you like they would in the good ole days.

If you have a couple hours and are in the Phoenix area you should take a yonder to Downtown Glendale.

Until next time ~ Happy Travels!

Thursday, July 26, 2018

Hipster Birthday Cards

Have you ever been looking through your stash and discovered an awesome set of stamps that you did not even know you had? That recently happened to me. I stumbled upon my Tim Holtz Hipster stamp set and I was inspired to make a set of sarcastic cards!
 I colored the images in with Distress Markers and cut them out with my Scan N Cut. I set those aside and started on the base of my card. I used Distress Oxides  to create the backdrop. For the banner, I used Distressed ink on Stamping Paper and Watercolor Paper. I randomly stamped the Birthday Stamp Set and created two banner pieces using the Thin Fish Tail Banner Die Set . I inked all the edges and assembled the cards making sure to set each Hipster on pop dots for some added dimension. I finished off the card with Tonic Nuvo Drops . Here is a close up of each card:


Until next time ~ Happy Crafting!

Saturday, July 21, 2018

How To Create a Textured Layout!


I started scrap booking 29 years ago, so you can only imagine how three kids later and a lifetime of adventures can add up! One thing that has become crucial in my albums is to only use one a year, therefore I need the layouts flat. For a few years I was filling up 5-6 albums. After awhile I ran out of places to keep them. I do not want to skip documenting important event or time because I do not  know where to store them. Hence, the transfer to flat pages. 7 Gypsies Architecture stickers and  mixed media pads are perfect to create stunning yet flat pages (that have some texture). I created this page using only a few sheets from a mixed media pad and sets of Architecture stickers. My kids and I discovered an awesome Ghost town on their spring break that I wanted to remember.

This is the paper I used:

I fussy cut some of the images from the Gypsy Mixed Media Pad to use as my title, photo mattes, and embellishments. To cut the inside of the large frame I found it most beneficial to use my exacto knife and glass mat.
I distressed the edges of the pieces that were straight by running a pair of open scissors along the edges and inked them all.
I used pop dots to adhere the large frame to the base page. This gave the layout extra interest because of the depth caused by the frame being lifted slightly.

Next, I placed a few stickers on the base of the page tucking the edges under the frame.
I used the smaller frames to not only frame the pictures, but also as mattes.
I added a few pop dots to two of the framed pictures to add more interest.

I added the large title to the corner of the layout over the frame. I used pop dots where the numbers touched the base.

Finally I added a few more stickers to round out the layout.

I did not feel as though the layout needed much text, so I skipped the journaling on it and just let the pictures speak for themselves.
Products Used:
Mixed Media Pad
Junque Pack Cabin
Crystal Ornaments Trinkets
Until next time ~ Happy Crafting!

Thursday, July 19, 2018

Updating my Craft Desk

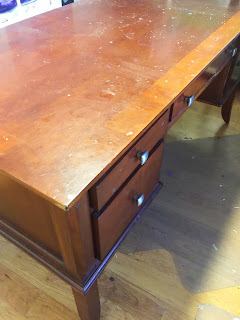
I have been working on the same desk for two decades and though I love it, it is time to bring it into this century. I purchased this desk as part of a set as Costco. It has been in a few different rooms in my home, but about seven years ago it finally found its resting place in my craft room. I like how much work space I have on it. It also is well made and sturdy.

 Not only did I want to change the color, I also wanted to clean and cover many of the paint and mist spots I had on it from creating. I wanted to go with a color that would benefit from my mess -- add character. I gave it a good cleaning and tried to remove as much of the dried on glue as I possible. I then had my boys cover my work area with a large plastic tarp.
 I decided to first paint the desk in Ivory followed by Jade . I purchased two jars of it.
 I was skeptical when the instructions stated the desk did not need to be prepped. I just needed to make sure it was free from dust. However, not only did the Ivory paint go on beautifully, it dried fast! I did let it set over night before I applied the Jade just to be on the safe side, but it was unnecessary.
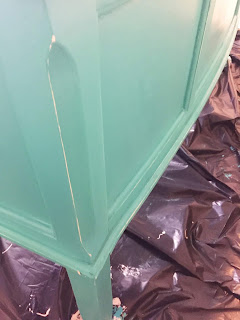
I painted the Jade over the white.
 I used Painter's Tape to tape around my knobs as to not get paint on those. I wanted to replace them, but they ended up being to cumbersome to remove.


The Jade dried as fast as the Ivory.

I took a piece of sandpaper to distress the edges and let the white show through. However, I did not finish it because this is my craft desk and it would distress, scratch and ding up in time with as hard as I am on it.

I was able to move my supplies back on my desk rather quickly after applying the paint.
 I am so pleased with how it turned out. It really makes the desk pop and brings a smile to my face every time I walk into the room.
Until next time ~ Happy Crafting!