Christmas is a special time of year and getting everything done to create a fun memory can be a challenge with a family of five. I need all the help I can get, so I created this planner. This is a two part post. First, I show you how to make the cover for the planner. Then, I show how to make a pocket folder for it in a video. I hope you enjoy it and find it useful!
To create the cover you are going to need two pieces of foam found in the kids' section of most craft stores. One needs to be adhesive and it if sparkles even better!
Measure two lines with a ruler on the backside of your adhesive foam with a pencil.
Take a circle, fold it in half and use a ruler to trace the line.
line up the line on the circle with the one on the adhesive backing and trace half the circle.
Repeat that process and cut out the scallop border. Set aside.
Measure your cover to your preferred size. Find the center and score 1/4 inch line on the right and left of the center (leaving a 1/2 inch space).
Mark where to place your holes for the bands.
Punch holes. I like the Crop-O-Dile because it cuts any thickness.
Adhere your scallops to the cover lining up the edges.
Thread your elastic thread through the two holes according to how many inserts you are going to use.
Here is a video on how to make the multi pocket file:
Here are a few pictures of the inside of the complete planner:
This was a ton of fun to make and I can't wait to use it this season!
Do you have a collection of bits of paper -- scraps? Often times I will go through my scraps and will be amazed at how pretty the paper is and wonder why I did not use it up. Then, I wonder how I could use it. Often times we get stuck in a rut with our scraps. They are not big enough to be a base and to small to mat a photo. I discovered a great way to get the most millage out of my scraps by punching them! I like to create seasonal or themed "kits" to work out of. This allows me to utilize my supplies so I don't turn into a hoarder. I also come up with the most creative projects when I have a few things set up and ready to go in a kit. I rummage through my stash of scrap paper and pull out all the scraps that would go with my theme. Next, I look through my stash for half used packages of things that would match. I punch out shapes and put them together to create unique embellishments for projects. When I have thoroughly enjoyed a kit and need to move on I either pass on my leftovers to my scrappy friends or toss them -- and I don't feel guilty about it. I really do get the most I can out of my supplies when I do it like this.
After I got done setting up this kit I noticed that some punches worked better than others and some downright hurt my hand! I wanted to share with you this information. That way if you are looking to purchase punches you will have a better idea of comfort and quality.
Fiskar: The Fiskar Hexagon punch is by far the most comfortable easy punch I have ever used. It fits nicely in my hand and is smooth. It does not require a lot of pressure or squeezing on my part to punch the shape. I used it on card stock and cork. It cut like butter! However, the other Fiskar punches I have (most of which I have not used before this project and are new) did not punch through anything thicker than a flat piece of paper easily and hurt my hand. I will buy the Fiskar brand with the handle like that on my Hexagon punch, but I will never purchase any of the other kinds again.
Close To My Heart: These punches are about average. They cut pretty smooth, but after time they do become dull in places. When they get dull I punch them on foil a few times and that helps. I bought these because I used to sell the product, otherwise they would not be in my stash. They do not hurt my hand -- which is great!
Stampin' Up: I really like these punches! Not only do they punch well, stand the test of time, but they are super CUTE! They also have coordinating stamps which is really nice. They don't hurt my hand when I use them. I don't know if they can punch in anything thicker than a piece of flat card stock because I have never had the need to do so. I have used them a lot and they have not gotten dull yet -- that is good because they are on the rather high end for cost. I will purchase these again.
EK: These are by far my favorite! I love them! They are fairly priced, can cut through thicker materieal, never hurt my hand and I have not had to sharpen them yet. I use these a lot, simply because they are so comfortable. They have a nice locking mechanism on the bottom as well. I always look at these stamps before I check out any other brand. I will purchase these again.
Here is the tutorial I created showing how to use your punches and a few ideas on setting up a kit.
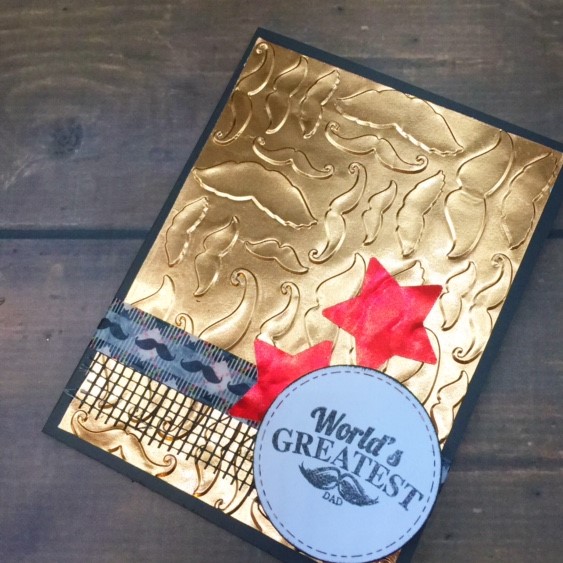
It is almost here -- Father's Day! Do you struggle with finding the perfect gift for Dad? I know I certainly did! Now, I encourage the kiddos to make cards for their Dad served up with a homemade breakfast and a new lego set (really aren't men all into legos?) . I'm obsessed with Brutus Monroe's Stamp of the Month and thought it would pair nicely with a mustache embossed sheet of Rinea Foiled Paper in Copper.
For the first card I ran a piece of Rinea Foiled Paper through my Cuddlebug with a mustache embossing folder I had in my stash. I adhered it to black cardtock, punched some stars out of Ruby Rinea Foiled Paper and assembled the card. I used some mesh from my stash to add a bit more texture to the card making sure it stayed flat so I could mail it.
For the next card, I embossed copper foiled paper again. Only this time I used a white card base and assembled the card.
These cards are so much fun to make! They are easy enough the a kiddo can put it together for their Dad.
Make sure you check out the Rinea Blog for more inspiration!
I wanted to create a fun serving tray that I could carry two drinks on that would not only serve as something of function, but also a focal piece. I have no intention of serving food on it so I knew I could add some fibers on the inside of the tray to finish it off.
I started off with dominoes that I found at Walmart, a tray I picked up at Joann's, Beacon 527 adhesive, Cowgirl Digital from Calico Collage , Sparkle Mod Podge (because every Cowgirl can benefit from a little bling, right?), and Dishwasher Mod Podge.
The first thing I did was adhere the digital download images to dominoes. I did not ink the edges, because those would not be seen in the tray. I also really liked the white! For this tray I needed 34 dominoes.
Using Beacon 527 I laid the dominoes like tile on the tray making sure to mix up the pattern to create interest.
I applied a medium coat of the sparkle Mod Podge first stirring well with my brush. It is important to stir and not shake it. I let this dry overnight.
Since my intention is to use this as a serving tray with cold beverages I needed to make it waterproof. I will never run it through a dishwasher because it is medal and will rust. Plus, I wanted to use some fun burlap in it. The dishwasher Mod Podge is safe for a dishwasher which means it is waterproof so I finished off the project with it. I layered it on really thick making sure that it filled in the holes between the dominoes. I let this sit for 28 days.It takes that long to properly make sure it is cured. I then finished it off by adding burlap to the edges with the Beacon 527.
I am very happy with how it turned out! Not only can I serve drinks on it, I can also prop it up to display when not in use.
Make sure to check out how other crafters used Mod Podge in their art!
I made a necklace, matching card and gift bag for a Fairy Fan. I thought I would share how I did it. This was a super easy thing to make using a digital download. I found mine at Calico Collage ! She has the best art I have ever seen and a huge selection. It was hard to pick which one I wanted to feature.
To see how I put it together I made a video tutorial for you. You can find it here
Please subscribe to my blog and channel if you have not already done so. I have a lot of fun stuff coming out soon.
Sorry....I have had that song in my head forever and a day! Why? Well, because I have been wanting to put a metal looking roof (tin) on this bird house!
It started off like this -- sad...ugly and plain. It really should be a spooky haunted house, but by the time I had figured that out it was to late. I already had spent a day putting it together. Instead of pitching it I decided to just hide it from myself until I could look at it again without getting mad. Have you ever been there? Gotten frustrated with yourself because you put so much time into a project and have it just turn out bad? I was there with this!
I then started thinking about my little sad house and thought a roof that looked like gold would be cute on it and maybe save it from the dumpster. I pulled out my Rinea foiled paper and got to work! First thing I did was fold it over like so....
Next, I punched a bunch of circles....
I started on the botttom of the roof and applied a row of circles.
Instead of keeping the roof all gold I thought it would add some personality to rotate in silver -- and that's just what I did :-)
I repeated the process until the roof was covered.
I hid the top crease with a line of Rinea circles.
I folded and flipped up the edges to help the roof stand out.
I then went back through and did the same to the side pieces and porch. I punched some butterflies and leaves and sprinkled them on the house and called it done!
I really like the look of the roof! I think this will be my stand by on altering them in the future.
I have a confession to make....though I am on who likes to push the limits in my art and I love edgy things, I have always steered clear of skulls. It is not like they offend me. I just struggle with the concept of them and making them pretty. However, living in the Southwest and participating in Day of the Dead and Cinco De Mayo I have grown to admire Sugar Skulls. I thought it was time that I used them in my art.
I wanted to create something colorful, whimsical and pretty so I stuck with bright bold embellishments that I made with Rinea Foiled Paper
I found these Sugar Skull paper dolls to be gorgous and I had to use them from Calico Collage .
I upload a step by step how to on making this card here . Please go check it out and don't forget to subscribe if you have not already done so!
Mother's Day is just around the corner! This year I decided to make my Mom a card with a bunch of fun stuff from Brutus Monroe that just came out! First up creating a base using the Scratch background with the Lemon Zest Surface Ink.
I also stamped the butterfly with the same stamp and ink
I used the Detail ink in Raven to stamp these gorgeous roses from the Banner stamp set.
I wanted to add some color so I dabbed Sage Surface Ink on my craft mat, spritzed it with water and grabbed my paint brush.
I painted the leaves with it.
I did the same thing again using the Rouge Surface Ink on the roses.
As the roses dried I stamped the sentiment on two tags that I had made out of the tag die cuts with the Peg Alphabet.
I used my Scan n Cut to cut the flowers and cut out the backing from pop dot packaging.
I put the butterfly together.
I then put it all together.
This went off in the mail today! I mailed her a little gift too (she lives in another state) so I did not have to worry about smashing the butterfly into an envelope.