In July the Canvas Corp Brands crew was challenged to do something with a blank sheet of canvas and we could use a pouch too. I created this:
I glimmer misted a piece of raw canvas in blues and greens and then cut them into strips. I tied a knot in the bottom of each strip and adhered it to a circle that I had cut from double sided adhesive. I twisted the canvas strip and placed it on the circle. I also did this same technique with some pretty twine.
For the leaves I hand cut them out of the green portion of the canvas, added some veins with a black water color brush pen and spritzed it with a little water to soften the lines.
I adhered it all to the pouch and added a few gems to fill it out.
When I was first presented with this challenge I was totally clueless on what to do. I just started painting and then got to this. What have you created that was unexpected?
I recently have started swapping pocket letters with a great group of online ladies. When I was asked to join the "Denim and Diamond" swap I did not hesitate. Once I realized what I signed up for I was a little scared. I kept thinking of cowgirls, but did not want to incorporate that into it. I then realized that I had an old pair of my daughter's jeans that had bling on the leg. She wore them all the time when she was 6 (ten years ago) and I found them for her at Walmart for $6. I decided to use those as the base. I first cut them down to ATC size (2.5 by 3.5) and mod podged them with extreme glitter Mod Podge to a baseball card for stability. As they dried I added my signature stamp to the back of nine ATC blue cardstock cut bases. Once they were dry I attacked them to the blue cardstock. I inked up one of Rita Barakat's stamps with white paint and stamped it in a random order on the denim. I decided on this particular stamp because the circles in the hair looked like places for bling. Once it dried I added gems and bling items from my stash and stuffed a baseball sleeve to create the pocket letter. It was missing something so I created a layered heart embellishment and a shabby chic flower from the leftover denim. I added a butterfly charm and attached it to the sleeve.
I never dreamed that my scraps (literally!) would create something beautiful. To make the two embellishments check out this video:
If you did not see my three minute video on how to use Rita Barakat stencils, please find it here:
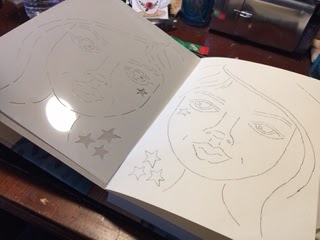
This is the follow up of coloring in my girl! I took a ton of pictures of each step that are self explanatory. This is the stencil I used on the video and what she looked like after I connected all the lines:
I used these to color in her face:
I added several shades and I colored in her eyes with Scribble Sticks:
I used a wet paint brush to smooth out the texture. I traced around her face with a darker color:
I filled in her eyebrows with one of the darker pencils. I used the black pencil to give her eyelashes (I love a lot of eyelashes!):
I used scribble sticks to fill in her lips by tracing around the edges and pulling the color into her lips with a wet paint brush.
I colored in the stars:
Now it got fun! The hair! I absolutely love to create hair! I used scribble sticks and a wet paint brush to color.
I finished her with a little bit of glitter streaks in her hair and white dots on the purple strand:
I can not draw, but this stencil made it super easy! I can't wait to create more in my art journal with Rita Barakat Stencils!
Have you ever found something that you love, but want to use it differently than how it is intended to be used? That is what happened when I found this to make heart charms. I really wanted to make a mixed media canvas with the hearts as part of the body and a beautiful clay doll head from Lisa Kettell Designs to create this:
I also had some medal wings and crown by Tim Holtz as well as angel wings from 7Gypsies that were perfect for this piece. I used the new Prima rust paint system with some modeling clay to create the background and used Nuveo Dew Drops to outline the hearts in the body. I recorded the process as a segment in my "Behind the Art" showcasing how it came together. You can watch it here:
I fell in love with the new Dyary line from Dylusions. Well, let's face it...I like everything Dylusions comes out with! However, this month they released an amazing new large planner! Now, I need another planner like I need a hole in my head. However, her planners (that she calls Dyary) are awesome because they have her beautiful background pages in them. I hate my handwriting and need lines to write, so I thought this would make a great Quotes journal!
Here are the links to the supplies I used to create this into page into my journal:
I am starting a new series on my channel, Behind the Art, in which I am creating. The camera is above my work station and I have sped up the video and turned off the sound. My first episode was creating this! Please check it out and leave me some feedback. Do you like it? How do you feel about no sound? Was it to fast or just right?
Instead of giving a card, why not give a small canvas? I created two canvases using Dina Wakely paint, plastic mesh, and Brutus Monroe stamps.
For the Birthday Canvas I first painted the canvas with white gesso and topped it off with Dina Wakely paint and stencils. I added plastic mesh with Sparkle Mod Podge and heat set it so it melted right into the canvas. I layered three strips of washi tape on the bottom, punched four stars out of Rinea Foiled Paper and placed them in the corners. I stamped an image from the Birthday Badges stamp set on a scalloped circle and inked the edges. I placed that in the corner and topped it off with a fun clay candle by Lisa Kettell Design.
I had so much fun creating the Birthday canvas that I decided to create an "Owl Always Love You" with the Owl Love You stamp set and coordinating die.
You can find the stamps and coordinating dies at Brutus Monroe .